PrintGraph Extra Documentation
For more information visit PrintGraph.
Setting up a print job
Setting up a print job requires several steps:
- Load the functions with PrtGRxLoadFuncs
- Intialise the printing environment with PrtGRxInit
- Choose a printer with PrtGRxPrinterDialog
- If necessary set the job properties with PrtGrxJobProperties
- Set the page margins with PrtGRxSetMargins
- Set up the aspect of header with PrtGRxSetHeaderMode
- Set up any header text with PrtGRxSetHeader
- Set up any footer with PrtGRxSetFooter
- Open the print job with PrtGRxOpenPrintJob
- Print your texts, tables, bitmaps etc.
- Close the print job with PrtGRxClosePrintJob
- Destroy the printer object with PrtGRxTerm
- If you wish, drop the functions with PrtGRxDropFuncs
Since headers and footers often contain constants like the date or the document title and variables like the page number, the texts defined for these can contain special formatting characters.
Note
All the input parameters that denote positions are by default in millimetres or 1/10 inch depending on the Measures property. You can convert from inches using the formula:
mm = 254 * inch
All the line widths are defined in TWIPS:
1 Point = 20 TWIPS
1 mm = 56.7 TWIPS (rounded to 57 for internal calculation)
Warning: If you wish to print several documents concurrently (i.e. in parallel threads) you must initialise and terminate the environment for each thead with PrtGRxInit and PrtGRxTerm.
Formatting Characters
To help define header and footer texts with PrtGRxSetFooter and PrtGRxSetHeader the following special formatting flags are defined:
┌────────┬────────────────────────────────────────────────────────┐
│$       │If followed by one of the other characters in this table│
│        │it indicates a formatting character follows, otherwise  │
│        │it is taken as a literal '$'                            │
├────────┼────────────────────────────────────────────────────────┤
│l       │Left align the following text                           │
├────────┼────────────────────────────────────────────────────────┤
│r       │Right align the following text                          │
├────────┼────────────────────────────────────────────────────────┤
│c       │Centre the following text                               │
├────────┼────────────────────────────────────────────────────────┤
│@       │Insert the current date formatted acording to the system│
│        │settings. This is read every time a job is started; so  │
│        │you can change the date format from job to job in the   │
│        │same sesssion.                                          │
├────────┼────────────────────────────────────────────────────────┤
│?       │Insert the current time ( taken when the job is opened) │
│        │formatted acording to the system settings. This is read │
│        │every time a job is started; so you can change the time │
│        │format from job to job in the same sesssion.            │
├────────┼────────────────────────────────────────────────────────┤
│!       │Insert the current date and time ( taken when the job is│
│        │opened) formatted acording to the system settings. This │
│        │is read every time a job is started; so you can change  │
│        │the time format from job to job in the same sesssion.   │
├────────┼────────────────────────────────────────────────────────┤
│#       │insert the current page number (always arabic)          │
├────────┼────────────────────────────────────────────────────────┤
│¦ or |  │Insert the title of the document (see PrtGRxOpenPrintJob│
│        │)                                                       │
└────────┴────────────────────────────────────────────────────────┘
Example
'$¦$rpage $#' would give:

Document Title                                       page 1
'$r@ page $#' would give (where date is defined as ISO with '/' separator):

                                                         1995/03/18 page 1
Warning: Formatting characters only apply to the page and table header and page footer texts.
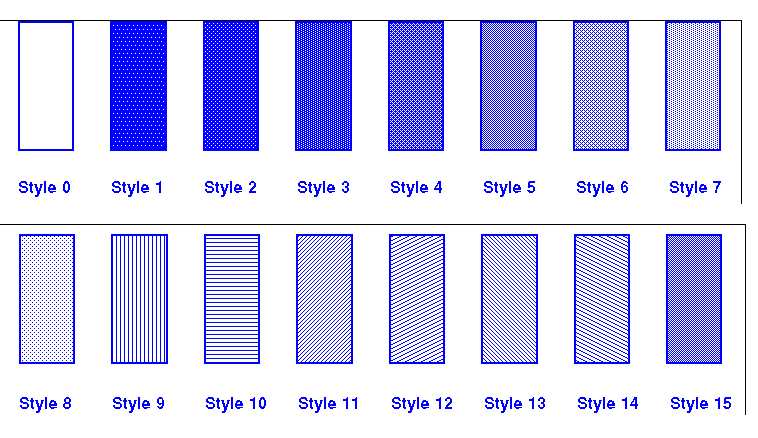
Fill Styles
Several of the Printer functions refer to a fill style. You can see the effect of a style for any printer by running the DEMO program and printing the box styles option. The numbers you pass to any of these functions is translated into a PATSYM_????? constant, and the output is, to a certain extent, device dependent. For an idea of what you will obtain see the pictures below.
