Stupid OS/2 Tricks/Warp Tips: Difference between revisions
→System: update to latest revision |
mNo edit summary |
||
| Line 1: | Line 1: | ||
{{Stupid}} | |||
[[Image:Stupid5.png|right]] | [[Image:Stupid5.png|right]] | ||
This section covers tips and tricks for OS/2 Warp. | This section covers tips and tricks for OS/2 Warp. | ||
Revision as of 13:14, 11 April 2017

This section covers tips and tricks for OS/2 Warp.
System
This section covers System tips for OS/2 Warp.
Changing printing from polling to interrupt driven
Warp
The default mode of printing under OS/2 Warp is now via polling, rather than interrupt-driven, as was the case in previous OS/2 versions. Polling can cause problems with printing on some systems, and can use more system resources.
To change from the polling mode of printing to interrupt-driven printing, edit the following line in your CONFIG.SYS file:
BASEDEV=PRINT01.SYS
to
BASEDEV=PRINT01.SYS /IRQ
Note that using the interrupt-driven mode of printing requires the use of IRQ 7.
Recovering a deleted Launchpad
Warp
You can recover a deleted Launchpad by adding the word LAUNCHPAD to your SET AUTOSTART line in your CONFIG.SYS file.
Conversely, to prevent the Launchpad from opening at boot, remove the word LAUNCHPAD from your SET AUTOSTART line.
Related subject(s):
- Removing the Launchpad permanently
Keeping the system running, even through traps
Warp
To keep an unattended system, such as a BBS, running despite a TRAP condition, add the following lines to your CONFIG.SYS file:
REIPL=ON
Setting REIPL to ON will automatically reboot your system when a TRAP occurs.
SUPPRESSPOPUPS=<drive>
SUPPRESSPOPUPS will prevent TRAP information from popping up and will log the popup information to a log file. <drive> is the drive to which the log file POPUPLOG.OS2 is written.
DUMPPROCESS=<drive>
DUMPPROCESS causes a process dump file PDUMP.* to be written. <drive> is the drive letter to which PDUMP.* will be written.
Setting the swap file
contributed by Jack Tan
Warp
The swap file in OS/2 Warp will tend to grow larger than in previous versions of OS/2 because certain DLLs are treated differently. Therefore, to prevent excess swapping, you may wish to increase the default size of your swap file from the value which you used in previous versions of OS/2.
Related subject(s):
- Adjusting your swap file
Creating OS/2 Warp boot diskettes
Warp
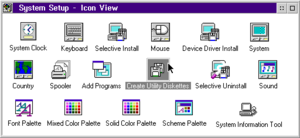
OS/2 Warp has its own facility to create boot diskettes. Simply open the System Setup folder and open the Create Utility Diskettes object.
Displaying the Recovery Screen
Warp
OS/2 Warp provides a recovery screen during reboot which gives you the following choices:
- Use customized configuration files.
- Boot to a command line.
- Restore previously archived configurations.
- Reset your primary display to VGA mode.
- Boot to the Maintenance Desktop.
To reach the recovery screen:
- Boot OS/2 Warp.
- During boot, a small, white box will appear in the upper left hand corner of the screen.
- While the white box in onscreen, press the Alt and F1 keys simultaneously.
- The Recovery Choices screen will appear.
Related subject(s):
Displaying Device Drivers on Boot
Warp
contributed by Markku Leinio
To display device driver names on boot:
- Boot OS/2 Warp.
- During boot, a small, white box will appear in the upper left hand corner of your screen.
- While the white box is onscreen, press the Alt and F2 keys simultaneously.
- Device driver messages will appear on the screen as the drivers are loaded.
Dual Booting Without Confirmation
Warp
contributed by Jack Tan
To dual boot between DOS and OS/2 configurations using the command line without a confirmation message, use the /QUIET command line switch. For example:
BOOT /DOS /QUIET
or,
BOOT /OS2 /QUIET
Adding Temporary LIBPATH Entries
Warp
contributed by Ian Hargreaves
It is possible to add temporary LIBPATH entries to an OS/2 session using the SET BEGINLIBPATH and SET ENDLIBPATH statements.
To add subdirectories to the beginning of the LIBPATH:
SET BEGINLIBPATH=<drive>:\<subdir1>;<drive>:\<subdir2>;
where <drive> is the drive for the temporary LIBPATH addition(s) <subdir1> and <subdir2> are the subdirectories to add to the LIBPATH
Showing the Buildlevel of EXE and DLL Files
Warp
contributed by Jack Tan
To display the buildlevel of IBM files, type:
BLDLEVEL <filename>
where <filename> is an IBM *.EXE or *.DLL file
Loading Multiple Configuration Files at Boot
Warp
Sometimes you might need to boot your OS/2 Warp machine under different versions of CONFIG.SYS. The OS/2 Warp Recovery Screen provides a way to do this.
To use multiple CONFIG.SYS files:
- Make a backup copy of your CONFIG.SYS file and save it in a safe place.
- Copy the CONFIG.SYS file to the BOOT subdirectory as follows:
COPY <boot drive>:\CONFIG.SYS <boot drive>:\OS2\BOOT\CONFIG.?
where <boot drive> is your OS/2 Warp boot drive, ? is replaced by any single letter of the alphabet, except X, x, C, c, M, m, or V, v. - Make any custom modifications you desire to your \OS2\BOOT\CONFIG.? file.
- Create a batch file called ALTF1?.CMD in <boot drive>:\OS2\BOOT where the ? is the same alphabetical character you used for CONFIG.?. The contents of the batch file should read:
COPY <boot drive>:\OS2\BOOT\CONFIG.? <boot drive>:\CONFIG.SYS
where ? corresponds to the alphabetical character you used for CONFIG.?. - Change to the <boot drive>:\OS2\BOOT subdirectory.
- Remove the read-only attribute from the file ALTF1BOT.SCR as follows:
ATTRIB ALTF1BOT.SCR -R - Edit and add lines to the end of ALTF1BOT.SCR describing your new configuration choices. You should include the alphabetical character of each choice, the name of the configuration file, and perhaps some descriptive text. For example:
A CONFIG.A Configuration A
B CONFIG.B Configuration B - Save ALTF1BOT.SCR.
- Replace the read-only attribute as follows:ATTRIB ALTF1BOT.SCR +R
- Your configuration choices should now show up on the Recovery Screen.
Related subject(s):
Workplace Shell
This section covers Workplace Shell tips for OS/2 Warp.
Tearing off Launchpad drawer
Warp
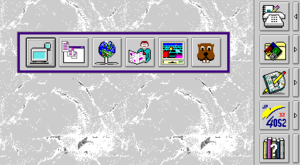
You can "tear" off a drawer from the Launchpad and place it where you wish. Note that the drawer will disappear if the Launchpad is minimized or closed.
- Open the desired drawer.
- Drag the drawer to the desired location using either mouse button 1 or mouse button 2.
- To retrieve the drawer, just close the drawer as usual.
Opening the Settings Notebook
Warp A quick method of opening the Settings notebook for an object:
- Highlight the desired object.
- Hold the Alt key.
- Double click on the object with mouse button 1.
Related subject(s):
- Closing the parent folder when opening an object.
- Opening a windowed command line in the background
Closing the parent folder when opening an object.
Warp
You can automatically close the parent folder when opening an object:
- Highlight the desired object.
- Hold the Shift key.
- Double click on the desired object with mouse button 1.
Related subject(s):
- Opening the Settings notebook
- Opening a windowed command line in the background
- Closing parent folders automatically
Removing the Launchpad permanently
Warp
To remove the Launchpad permanently from your system, drag the Launchpad object to your Shredder. Then, remove the word LAUNCHPAD from the SET AUTOSTART line in your CONFIG.SYS file.
Related subject(s):
- Recovering a deleted Launchpad
Editing animated folder icons
Warp
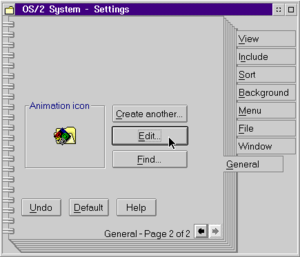
To edit the animated folder icon:
- Open the Settings notebook for the desired folder.
- Click on the General tab.
- Click on the right arrow in the lower right corner of the page.
- Edit and save icon as usual, or change icon as usual.
Bringing the Launchpad to the top
contributed by Jack Tan
Warp
You might know that double-clicking with mouse button 1 on the OS/2 desktop will open the Launchpad, but double-clicking on the desktop is also useful for raising the Launchpad to the top if it is covered by other windows.
Closing parent folders automatically
Warp
You can set all or some parent folders to close automatically when opening a subfolder or all objects.
To set parent folders to close automatically system-wide:
- Open the System object. It should be located in the System Setup folder.
- Click on the Window tab.
- Click once on the right arrow in the lower right hand corner of the page.
- Under "Folder Automatic Close," choose either "Subfolders only" or "All Objects."
Individual folders' automatic closure settings can be changed in the same manner through their individual Settings notebooks.
Related subject(s):
Setting default folder appearance
Warp
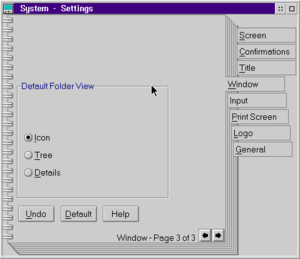
You can determine whether the folders on your system will default to icon, tree, or details view:
- Open the System object. It should be located in the System Setup folder.
- Click on the Window tab.
- Click twice on the right arrow in the lower right hand corner of the page. You should be on page 3 of the Window tab.
- Select Icon, Tree, or Details.
- Close the System object.
Customizing the Launchpad
Warp
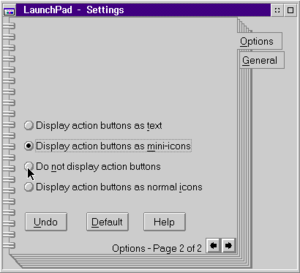
The Launchpad can be customized to your taste.:
- Click on an open area (no buttons) of the Launchpad with mouse button 2 to bring up its popup menu.
- Choose Settings to open the Settings notebook.
- Pages 1 and 2 of the Options tab contain several different options which change the appearance of the Launchpad. Choose the options you desire.
- Close the Settings notebook.
Creating Multiple Launchpads
contributed by Simon C. Pol
Warp
You can create multiple Launchpads for better organization of your desktop. To create additional Launchpads:
- Click on the background of the Launchpad (i.e., not on the buttons) with mouse button 2 to bring up the popup menu.
- Choose Copy from the popup menu.
- Copy the new Launchpad to the Desktop.
- Rename the new Launchpad to a name other than "LaunchPad"
- You now have an additional Launchpad that is ready for customization.
Related subject(s):
Using the Pickup Functions
contributed by Martin Lafaix
Warp
For those who might have trouble dragging objects with a mouse, OS/2 Warp offers the "Pickup" option, which will "pickup" and "hold" an object until it is dropped without having to hold the mouse button down while moving the mouse. To Pickup an object, hold the Alt key and click on the desired object with mouse button 2.
After you've picked up the object, you can do one of three things with it:
- Copy the object - hold the Ctrl key and click with mouse button 2 on the location to which you want to copy the object
- Move the object - hold the Shift key and click with mouse button 2 on the location to which you want to move the object
- Create a shadow of the object - hold both the Ctrl and Shift keys and click with mouse button 2 on the location on which you wish to create the shadow
Bringing the Launchpad to the Top Using the Keyboard
contributed by Jack Tan
Warp
To raise the Launchpad to the top in any folder, including the Workplace Shell itself:
- Deselect all objects in the folder by pressing the Ctrl and backslash (\) keys.
- Press the Enter key.
Related subject(s):
Opening Parent Folder While Closing Child Folder
contributed by Martin S. Hanoian and Martin Lafaix
Warp
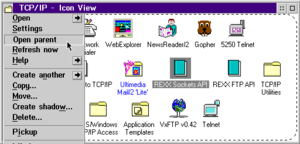
To close a child folder while opening its parent folder, hold the Shift key while choosing the "Open parent" option in the folder's menu.
Putting Template Buttons on the Launchpad
contributed by Robert I. Petersen
Warp
If you use a template frequently, it can be useful to have a template button on the Launchpad. Unfortunately, when you try to drag a template to the Launchpad, it becomes an object. The solution is to use the "Pickup" option to place the template onto the Launchpad.
Related subject(s):
Preventing Save of Desktop Settings Between Shutdowns
Warp
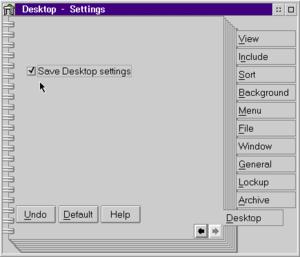
To prevent desktop settings from being saved at shutdown in OS/2 Warp:
- Open the Settings notebook for the desktop.
- Choose the Desktop tab.
- Uncheck the "Save Desktop Settings" box.
Command Line
This section covers Command Line tips for OS/2 Warp.
Obtaining information about your hardware
Warp
To obtain extensive information about your hardware, use the RMVIEW command at an OS/2 command prompt.
RMVIEW /?
will provide a list of the different command line switches which can be used with RMVIEW.
Setting video modes in a command line window
contributed by Jack Tan
Warp
In previous versions of OS/2, you could not specify non-standard column and row sizes in windowed command lines. In OS/2 Warp, non-standard sizes can be specified. Just use the OS/2 MODE command:
MODE <columns>, <rows>
where <columns> is the number of columns and <rows> is the number of rows
Related subject(s):
Viewing HLP Files Without Opening the Application
contributed by Jack Tan
Warp
To view a help file (*.HLP) without having to open the application, use the following command at a command prompt (you must have the Internet support installed):
VIEWHELP <filename>
where <filename> is an OS/2 help file that ends with the *.HLP extension.
Note: Typing VIEWHELP without parameters will give you a list of the available options for the command.
BonusPak
This section covers BonusPak tips for OS/2 Warp.
Command Line Options for the WebExplorer
contributed by Jack Tan
Warp
To increase the number of threads used by the WebExplorer (up to a maximum of 8), add the following into the Parameters box of the WebExplorer's Settings notebook:
-t <threads>
where <threads> is the number of threads desired
To prevent the WebExplorer from asking for confirmation when it is closed, add:
-q
to the Parameters box of the WebExplorer's Settings notebook.
Pulling Down Menus in WebExplorer Presentation Mode
contributed by Jack Tan
Warp
To access the pull-down menus when using the WebExplorer's Presentation Mode, tap the Alt key and use the arrow keys to pull down and move between menus.
Using Different INI Files with the WebExplorer
contributed by Doug Heintzman
Warp
To avoid building up long and unmanageable quick lists in the WebExplorer, create multiple WebExplorer icons and have them call different INI files by adding the following to the Parameters box of the WebExplorer's Settings notebook:
-i <drive>:\tcpip\etc\<filename>.ini
where <drive> is the drive, <filename> is the name of the INI file you wish to use
The first time you open the new WebExplorer object(s), you will receive a message that the INI file doesn't exist and and new one will be created.
Adding Fastkeys to the WebExplorer Quick List
contributed by Jack Tan
Warp
To add Fastkey access to the items on your WebExplorer QuickList:
- Click on the QuickList button to open the QuickList Document List box.
- Highlight the entry to which you would like to add the Fastkey.
- Click on the Edit button.
- Place a tilde (~) in front of the letter that you would like to use as the Fastkey.
- Close the QuickList Document List box.
- The Fastkey will show up as underlined when you use the QuickList pulldown menu.
Setting the Size of the WebExplorer
contributed by Christopher Hayashida
Warp
You can customize the size of the WebExplorer on your screen:
- Edit the file \TCPIP\ETC\EXPLORE.INI.
- To set the leftmost edge, add xleft=<pixels> where <pixels> is the number of pixels from the left side of the screen.
- To set the bottom edge, add xbottom=<pixels> where <pixels> is the number of pixels from the bottom of the screen.
- To set the width, add width=<pixels> where <pixels> is the number of pixels wide.
- To set the height, add height=<pixels> where <pixels> is the number of pixels high.