Real Glass: Difference between revisions
| (2 intermediate revisions by 2 users not shown) | |||
| Line 1: | Line 1: | ||
Written by [[Tels]] | ''Written by [[Tels]]'' | ||
==Abstract== | |||
In this article you will learn how to make good-looking, realistic glass objects/effects, which can be applied to images giving them a nice 3D touch. You will also learn how to speed things up, so that they work in real-time. | In this article you will learn how to make good-looking, realistic glass objects/effects, which can be applied to images giving them a nice 3D touch. You will also learn how to speed things up, so that they work in real-time. | ||
==Preface | ==Preface== | ||
I once asked the authors of a very good demo coder book here in Germany if I could do some work for them. They said yes, and I wrote a small demo, containing glass spheres. I never heard back from them, but the second edition of the book contains my effect. So, if you want to steal these things, go on - but I will hunt you down. | I once asked the authors of a very good demo coder book here in Germany if I could do some work for them. They said yes, and I wrote a small demo, containing glass spheres. I never heard back from them, but the second edition of the book contains my effect. So, if you want to steal these things, go on - but I will hunt you down. | ||
| Line 14: | Line 12: | ||
==The Things Glass is About== | ==The Things Glass is About== | ||
When you look at a raytraced image of a glass sphere, you will notice a couple of things: | When you look at a raytraced image of a glass sphere, you will notice a couple of things: | ||
| Line 26: | Line 23: | ||
So, to make real glass, we need: | So, to make real glass, we need: | ||
* refraction (!) | * refraction (!) | ||
* reflection (maybe) | * reflection (maybe) | ||
* light effects (maybe) | * light effects (maybe) | ||
The first thing is the most important thing, as you can see on the images above. | The first thing is the most important thing, as you can see on the images above. | ||
==How to make refraction== | ==How to make refraction== | ||
When light rays travel through a glass object into your eye, you see the things behind the object. But you see them distorted. This is a law of nature, and caused by the difference of the speed of light in glass and air. | When light rays travel through a glass object into your eye, you see the things behind the object. But you see them distorted. This is a law of nature, and caused by the difference of the speed of light in glass and air. | ||
| Line 40: | Line 34: | ||
To simulate the distortion, we use the following equation: | To simulate the distortion, we use the following equation: | ||
sin a1 c1 | sin a1 c1 | ||
------ = -- | ------ = -- | ||
sin a2 c2 | sin a2 c2 | ||
a1 and a2 are the two different angles of the light ray, and c1 and c2 are the different light speeds in the two different materials. | a1 and a2 are the two different angles of the light ray, and c1 and c2 are the different light speeds in the two different materials. | ||
| Line 56: | Line 46: | ||
==Let's Make a Sphere== | ==Let's Make a Sphere== | ||
To make a sphere, we take only a quarter (since a sphere is highly symmetric) and calculate the things for it. Then we copy it to the other 3 quarters. | To make a sphere, we take only a quarter (since a sphere is highly symmetric) and calculate the things for it. Then we copy it to the other 3 quarters. | ||
| Line 68: | Line 57: | ||
So, for every point in the quarter, we loop through the following pseudo-code: | So, for every point in the quarter, we loop through the following pseudo-code: | ||
<pre> | |||
for Y=0 to Radius/2 do | for Y=0 to Radius/2 do | ||
for X=0 to Radius/2 do | for X=0 to Radius/2 do | ||
| Line 78: | Line 66: | ||
newRadius = function (x*x+y*y); | newRadius = function (x*x+y*y); | ||
end | end | ||
</pre> | |||
'''function''' calculates a new radius. | '''function''' calculates a new radius. | ||
| Line 85: | Line 72: | ||
To make a quick hack, we can modify the code above to the following: | To make a quick hack, we can modify the code above to the following: | ||
<pre> | |||
for Y=0 to Radius/2 do | for Y=0 to Radius/2 do | ||
for X=0 to Radius/2 do | for X=0 to Radius/2 do | ||
| Line 96: | Line 82: | ||
iyo = function ( (x*x+y*y) / (Radius*Radius*dB) )*dB*y; | iyo = function ( (x*x+y*y) / (Radius*Radius*dB) )*dB*y; | ||
end | end | ||
</pre> | |||
'''function''' takes an argument from 0.0 to 1.0 and is defined as (for example): | '''function''' takes an argument from 0.0 to 1.0 and is defined as (for example): | ||
return sin ( 0.5 * PI * argument); | |||
The value of '''dB''' should be between 1.0 and 4.0, but 2.0 looks best. | The value of '''dB''' should be between 1.0 and 4.0, but 2.0 looks best. | ||
What do we now with the new coordinates? Remember our friend, the look-up table? Ok, let's create such one: | What do we now with the new coordinates? Remember our friend, the look-up table? Ok, let's create such one: | ||
<pre> | |||
for Y=0 to Radius/2 do | for Y=0 to Radius/2 do | ||
for X=0 to Radius/2 do | for X=0 to Radius/2 do | ||
| Line 123: | Line 103: | ||
iXDiff[ioa-x-ioy] = -ixo; iYDiff[ioa-x-ioy] = -iyo; | iXDiff[ioa-x-ioy] = -ixo; iYDiff[ioa-x-ioy] = -iyo; | ||
end | end | ||
</pre> | |||
Well, now we got two different fields, one with X-Offsets and one with Y-Offsets. When drawn, they look like: | Well, now we got two different fields, one with X-Offsets and one with Y-Offsets. When drawn, they look like: | ||
| Line 134: | Line 113: | ||
For every point to draw, take its location, and add the X and Y offsets to it. then draw that point instead: | For every point to draw, take its location, and add the X and Y offsets to it. then draw that point instead: | ||
<pre> | |||
for x=0 to width do | for x=0 to width do | ||
for y=0 to height do | for y=0 to height do | ||
| Line 142: | Line 120: | ||
newy = y + iYDiff[x,y] | newy = y + iYDiff[x,y] | ||
screen[x,y] = background[newx,newy] | screen[x,y] = background[newx,newy] | ||
</pre> | |||
The result will look like: | The result will look like: | ||
| Line 149: | Line 126: | ||
You'll notice couple of things that are slightly '''wrong'''. First the refraction is not mirrored. We can fix this by swapping the four parts of the sphere. Next, the refraction function doesn't look like the real one. We can fix this by popping in a better refraction function. To fix the refraction you need to: | You'll notice couple of things that are slightly '''wrong'''. First the refraction is not mirrored. We can fix this by swapping the four parts of the sphere. Next, the refraction function doesn't look like the real one. We can fix this by popping in a better refraction function. To fix the refraction you need to: | ||
* calculate the angle between the surface of the sphere and the incomming light ray | * calculate the angle between the surface of the sphere and the incomming light ray | ||
* calculate with that the angle of the light ray inside the sphere | * calculate with that the angle of the light ray inside the sphere | ||
| Line 162: | Line 138: | ||
This is a tricky thing, but you could pull a trick with the palette. For every point inside the sphere decrease the color by a constant factor, or use a light map with concentric circles. For speed reasons use a look-up table! | This is a tricky thing, but you could pull a trick with the palette. For every point inside the sphere decrease the color by a constant factor, or use a light map with concentric circles. For speed reasons use a look-up table! | ||
<pre> | |||
for x=0 to width do | for x=0 to width do | ||
for y=0 to height do begin | for y=0 to height do begin | ||
| Line 171: | Line 146: | ||
screen[x,y] = shadedcolor[ background[ newx, newy ] ] | screen[x,y] = shadedcolor[ background[ newx, newy ] ] | ||
end | end | ||
</pre> | |||
The result (without swapping this time again) is: | The result (without swapping this time again) is: | ||
[[Image:RealGlass-glass7.jpg]] | [[Image:RealGlass-glass7.jpg]] [[Image:RealGlass-glass4.jpg]] | ||
[[Image:RealGlass-glass4.jpg]] | |||
==The Shadows Fled== | ==The Shadows Fled== | ||
Well, now we need a light source. To simulate this, we add a shadow under the sphere, and then add a highlight above it. The normal but slow way to do this is as follows: | Well, now we need a light source. To simulate this, we add a shadow under the sphere, and then add a highlight above it. The normal but slow way to do this is as follows: | ||
# draw the empty background | # draw the empty background | ||
# shade a circle where you want the shadow to be | # shade a circle where you want the shadow to be | ||
| Line 191: | Line 161: | ||
==Scrolling== | ==Scrolling== | ||
For scrolling, just double the background image in height, and modify the start pointer to the background for every frame you draw by one line. This doesn't cost you extra time, since you only have to increase a pointer (and make sure it does wrap around!) for every frame. | For scrolling, just double the background image in height, and modify the start pointer to the background for every frame you draw by one line. This doesn't cost you extra time, since you only have to increase a pointer (and make sure it does wrap around!) for every frame. | ||
==The Need for Speed== | ==The Need for Speed== | ||
Well done, girls & guys. We have a glass effect. | Well done, girls & guys. We have a glass effect. | ||
| Line 209: | Line 177: | ||
Next thing we want to eliminate are the two different array for X and Y. Since our glass effect arrays have a fixed width, we can calculate a combined array and eliminate the multiplication by: | Next thing we want to eliminate are the two different array for X and Y. Since our glass effect arrays have a fixed width, we can calculate a combined array and eliminate the multiplication by: | ||
for y=0 to height do | for y=0 to height do | ||
for x=0 to width do begin | for x=0 to width do begin | ||
iDiff[x,y] = iDiffX + (iDiffY + HeightOfBackgrounPic / 2) * Width; | iDiff[x,y] = iDiffX + (iDiffY + HeightOfBackgrounPic / 2) * Width; | ||
Optimized pseudo code after this: | Optimized pseudo code after this: | ||
<pre> | |||
bpl = pointer2Background; | bpl = pointer2Background; | ||
spl = pointer2Screen; | spl = pointer2Screen; | ||
| Line 234: | Line 197: | ||
end | end | ||
overlayhighlight(); | overlayhighlight(); | ||
</pre> | |||
I bet someone can line this up in assembler with two or less clocks/pixel. :-) | I bet someone can line this up in assembler with two or less clocks/pixel. :-) | ||
| Line 244: | Line 206: | ||
A further speed enhancement can be made by applying the glass effect only on these parts really needing it. For this you could maintain a list of starting/ending point into the glass effect buffer. | A further speed enhancement can be made by applying the glass effect only on these parts really needing it. For this you could maintain a list of starting/ending point into the glass effect buffer. | ||
Ok, that's all. There is the [http://www.edm2.com/0512/glass.zip source code] available for this example. It is not perfect but should give you some ideas. I created it with the Visual Builder and the | Ok, that's all. There is the [http://www.edm2.com/0512/glass.zip source code] available for this example. It is not perfect but should give you some ideas. I created it with the Visual Builder and the [[VisualAge C++]] of IBM and used the DIVE-based FastCanvas by Dave B. | ||
Hope you had fun! | Hope you had fun! | ||
[[Category:Languages Articles]] | |||
Latest revision as of 15:52, 10 June 2017
Written by Tels
Abstract
In this article you will learn how to make good-looking, realistic glass objects/effects, which can be applied to images giving them a nice 3D touch. You will also learn how to speed things up, so that they work in real-time.
Preface
I once asked the authors of a very good demo coder book here in Germany if I could do some work for them. They said yes, and I wrote a small demo, containing glass spheres. I never heard back from them, but the second edition of the book contains my effect. So, if you want to steal these things, go on - but I will hunt you down.
The glass effect was conceived by me a year ago, or even longer. But as you know, I bet there are people who have thought of these things, too. Alas, I never saw a description of it - everybody goes 3D these days. To preserve the idea, I wrote this article, and while I was there, expanded the stuff a little bit. So, HAVE FUN!
And remember: This stuff isn't new, I only combined it to get something new, unique out of it.
The Things Glass is About
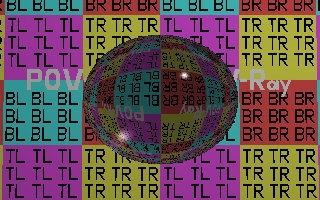
When you look at a raytraced image of a glass sphere, you will notice a couple of things:
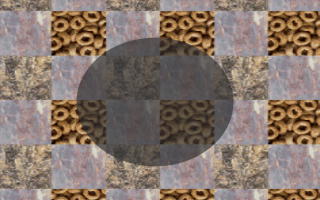
When you render the image with 3D-Studio, you get instead:
You see the difference? The raytraced image shows us the refraction, whereas the rendered image has only light effects.
So, to make real glass, we need:
- refraction (!)
- reflection (maybe)
- light effects (maybe)
The first thing is the most important thing, as you can see on the images above.
How to make refraction
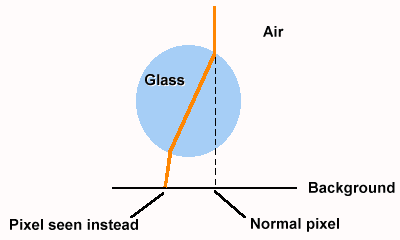
When light rays travel through a glass object into your eye, you see the things behind the object. But you see them distorted. This is a law of nature, and caused by the difference of the speed of light in glass and air.
When we simulate this in the computer, we send the rays from the eye to the world and measure where they hit the objects. This works, since the rays of light are reversible.
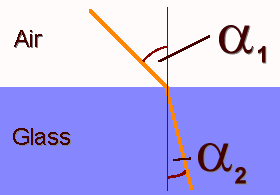
To simulate the distortion, we use the following equation:
sin a1   c1
------ = --
sin a2   c2
a1 and a2 are the two different angles of the light ray, and c1 and c2 are the different light speeds in the two different materials.
Here is a small picture:
You can find some values for different materials in any physics book.
Let's Make a Sphere
To make a sphere, we take only a quarter (since a sphere is highly symmetric) and calculate the things for it. Then we copy it to the other 3 quarters.
A sphere has a surface which is formed like this:
To simulate the light rays, we need the angle with the surface and the light. We assume that we look from directly above the sphere, and all light rays come straight down. (Camera view would distort (and complicate) this, we project just from top.)
As you can see from the picture above, the surface of the sphere drops down to the outside by the function cos(x). This is true for every point for the direction from the center of the sphere to the outside.
So, for every point in the quarter, we loop through the following pseudo-code:
   for Y=0 to Radius/2 do
    for X=0 to Radius/2 do
     // only for points inside the sphere
     if (x*x+y*y) < (radius*radius) then begin
       // the point we see is not the point , but
       // a point on a different radius
       newRadius = function (x*x+y*y);
     end
function calculates a new radius.
Well, this doesn't help us much, since we got the new radius, but not the new coordinates.
To make a quick hack, we can modify the code above to the following:
   for Y=0 to Radius/2 do
     for X=0 to Radius/2 do
       // only for points inside the sphere
       if (x*x+y*y) < (radius*radius) then begin
         // the point we see is not the point , but
         // a point on a different location
          ixo = function ( (x*x+y*y) / (Radius*Radius*dB) )*dB*x;
          iyo = function ( (x*x+y*y) / (Radius*Radius*dB) )*dB*y;
       end
function takes an argument from 0.0 to 1.0 and is defined as (for example):
return sin ( 0.5 * PI * argument);
The value of dB should be between 1.0 and 4.0, but 2.0 looks best.
What do we now with the new coordinates? Remember our friend, the look-up table? Ok, let's create such one:
   for Y=0 to Radius/2 do
     for X=0 to Radius/2 do
       // only for points inside the sphere
       if (x*x+y*y) < (radius*radius) then begin
         // the point we see is not the point , but
         // a point on a different location
          ixo = function ( (x*x+y*y) / (Radius*Radius*dB) )*dB*x;
          iyo = function ( (x*x+y*y) / (Radius*Radius*dB) )*dB*y;
         //Since the sphere is symmetric, we store it four times
          iXDiff[ioa+x+ioy] = ixo;  iYDiff[ioa+x+ioy] = iyo;
          iXDiff[ioa+x-ioy] = ixo;  iYDiff[ioa+x-ioy] = -iyo;
          iXDiff[ioa-x+ioy] = -ixo; iYDiff[ioa-x+ioy] = iyo;
          iXDiff[ioa-x-ioy] = -ixo; iYDiff[ioa-x-ioy] = -iyo;
       end
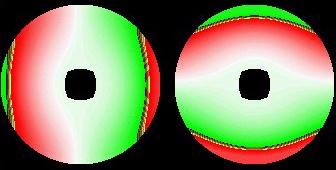
Well, now we got two different fields, one with X-Offsets and one with Y-Offsets. When drawn, they look like:
Red means negative value, green positive, white is zero. Black parts mean both X and Y offset are zero. The left picture shows the X Offsets, the right Y.
So, how do we apply this?
For every point to draw, take its location, and add the X and Y offsets to it. then draw that point instead:
   for x=0 to width do
     for y=0 to height do
       //background[x,y] would be the original
       newx = x + iXDiff[x,y]
       newy = y + iYDiff[x,y]
       screen[x,y] = background[newx,newy]
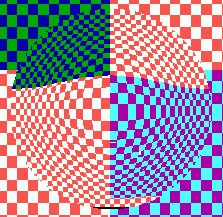
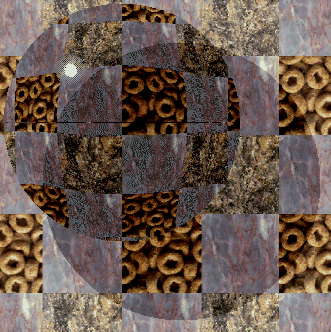
The result will look like:
You'll notice couple of things that are slightly wrong. First the refraction is not mirrored. We can fix this by swapping the four parts of the sphere. Next, the refraction function doesn't look like the real one. We can fix this by popping in a better refraction function. To fix the refraction you need to:
- calculate the angle between the surface of the sphere and the incomming light ray
- calculate with that the angle of the light ray inside the sphere
- use this angle then to calculate the point where the light leaves the sphere
- with this point, calculate the angle between the sphere's lower surface and the outgoing ray
- then calculate the exact angle that the light leaves the sphere
- take an (arbitrary) height of the sphere over the background surface and calculate the point where the light hits it
This is left as an exercise for the reader ;-) Remember that you have to do this for X and Y! Vector math would be real handy for this task.
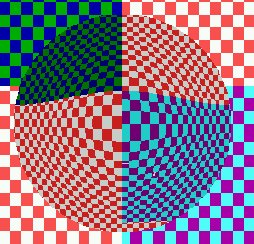
So, what can we do to make the image look even better? How about shading? The raytraced image shows us that the glass sphere absorbs some amount of light, thus the background appears darker inside the circle.
This is a tricky thing, but you could pull a trick with the palette. For every point inside the sphere decrease the color by a constant factor, or use a light map with concentric circles. For speed reasons use a look-up table!
   for x=0 to width do
     for y=0 to height do begin
       //background[x,y] would be the original
       newx = x + iXDiff[x,y]
       newy = y + iYDiff[x,y]
       screen[x,y] = shadedcolor[ background[ newx, newy ] ]
     end
The result (without swapping this time again) is:
The Shadows Fled
Well, now we need a light source. To simulate this, we add a shadow under the sphere, and then add a highlight above it. The normal but slow way to do this is as follows:
- draw the empty background
- shade a circle where you want the shadow to be
- apply the glass effect (this will shade the shadow darker if they overlap)
- draw a light effect on top of the glass effect
In the last section you will learn how to do this very quickly.
Scrolling
For scrolling, just double the background image in height, and modify the start pointer to the background for every frame you draw by one line. This doesn't cost you extra time, since you only have to increase a pointer (and make sure it does wrap around!) for every frame.
The Need for Speed
Well done, girls & guys. We have a glass effect.
Hey, where are you going? Didn't I tell you we will do these things in real-time? So, fasten your seatbelts again!
The code above needs many array look-ups to build the effect. Since this needs a considerable amount of time per pixel, we do something different.
Let's eliminate the shading look-up table:
We add the background image twice, once normal, and once shaded a little bit darker (for scrolling this means we need the background four times). For every Y-Offset inside the sphere add the height of the background pic divided by 2 (since the background is twice, for scrolling divide by 4), and instead of seeing the normal background, you get a slightly darker sphere. And this, of course, at no extra speed charge. :) This is because we combined the refraction table with the shading table.
With this method we can add only a darker shade with the same amount for every pixel. When we would use scrolling and different shades, the shades would scroll, too! To avoid this, make the second image is shaded by the same amount on every place, and overlay a small shaded highlight-effect after drawing.
Next thing we want to eliminate are the two different array for X and Y. Since our glass effect arrays have a fixed width, we can calculate a combined array and eliminate the multiplication by:
  for y=0 to height do
    for x=0 to width do begin
      iDiff[x,y] = iDiffX + (iDiffY + HeightOfBackgrounPic / 2) * Width;
Optimized pseudo code after this:
   bpl = pointer2Background;
   spl = pointer2Screen;
   opl = pointer2Offsetarray;   // combined X & Y: iDiff
   for y=0 to screenheight do begin
     for x=0 to screenwidth do begin
       //background[x,y] would be the original
       // add the current offset to the background pointer,
       // fetch the color and store it onto the screen
       *spl = *(bpl + *opl);
       spl++; bpl++; opl++;
     end
     // adjust pointer here ifbackground and shadetable
     // have different sizes than screen
   end
   overlayhighlight();
I bet someone can line this up in assembler with two or less clocks/pixel. :-)
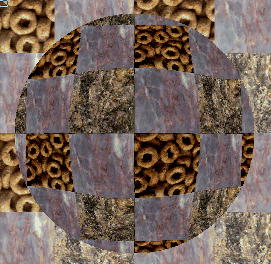
Another nice idea is to have the background sixfold, with two different shades. Before applying the sphere, add a circle of twice the background height to create a shadow. Here is a picture of the final result:
A further speed enhancement can be made by applying the glass effect only on these parts really needing it. For this you could maintain a list of starting/ending point into the glass effect buffer.
Ok, that's all. There is the source code available for this example. It is not perfect but should give you some ideas. I created it with the Visual Builder and the VisualAge C++ of IBM and used the DIVE-based FastCanvas by Dave B.
Hope you had fun!
